How to Draw a Rose Step by Step for Beginners
Have you ever wanted to learn how to draw a rose but didn’t know where to start? This beginner tutorial is here to help! Roses might seem tricky, but with this easy rose drawing guide, you’ll see just how simple it can be. Grab your pencil, relax, and let’s dive into this fun drawing lesson. Follow along, and you’ll create a beautiful rose step by step. Remember, every great artist starts somewhere—this is your moment to explore and enjoy!
Key Takeaways
Get basic tools like pencils, erasers, and paper to begin drawing a rose.
Use the step-by-step guide to draw the rose. Start with light pencil lines so you can fix mistakes easily.
Try shading and blending to make your rose look real and detailed.
Materials You’ll Need
Before starting your rose drawing, gather the right supplies. Using good tools makes drawing easier and more fun. Here’s what you’ll need:
Basic drawing tools (pencil, eraser, paper)
To get started, you’ll need these simple items:
Drawing pencils: Hard pencils (H or HB) are great for sketching. They don’t smudge much. Soft pencils (2B or 4B) are better for shading and adding depth.
Erasers: Have both a hard eraser and a kneaded eraser. Hard erasers erase bold lines, while kneaded ones are great for small details.
Paper: Use a sketchbook or plain drawing paper. Smooth paper gives clean lines, while textured paper adds character.
Sharpener: A sharp pencil helps you draw with more control.
These tools are simple and perfect for beginners to practice with.
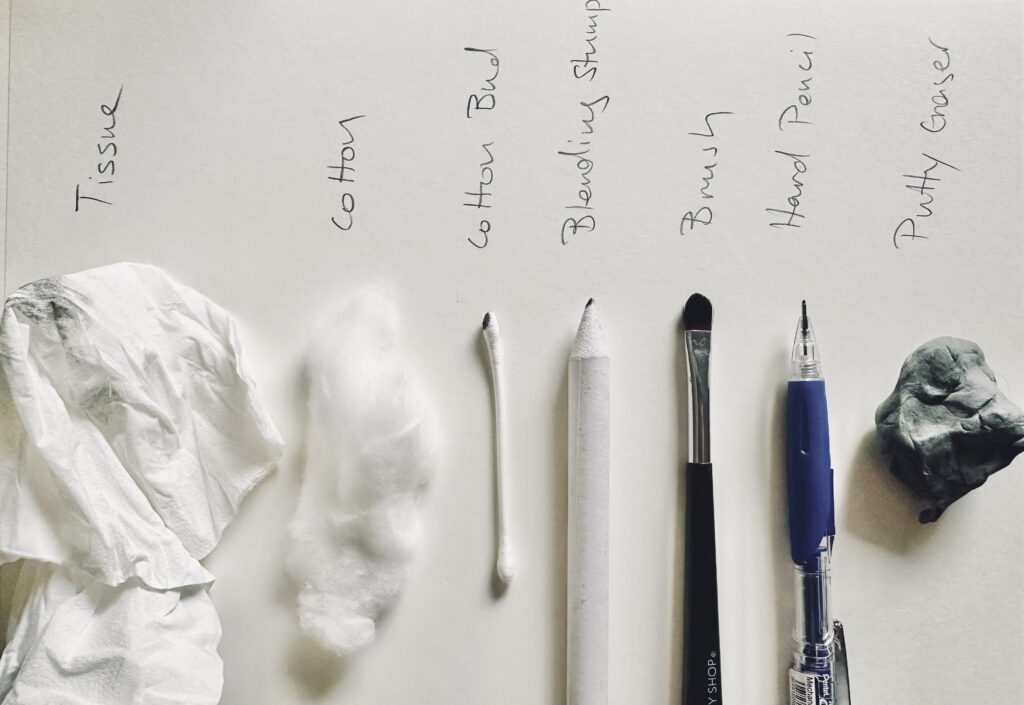
Optional tools for shading and blending (blending stump, cotton swab, tissue)
To improve your drawing, try using shading tools:
Blending stumps: These help make smooth transitions between light and dark areas. They also refine edges and details.
Cotton swabs or tissues: These everyday items are great for blending pencil marks. They work well on larger areas.
These tools can make your rose look more realistic by adding texture and depth.
Tools for coloring (colored pencils, markers, or watercolor)

Adding color makes your rose stand out. Here are some choices:
Colored pencils: These let you layer colors to create gradients.
Markers: Use these for bright and bold colors.
Watercolors: These are great for soft and delicate effects.
Coloring is relaxing and fun, so enjoy the process. Whether you stick to shading or add colors, it’s up to you!
Tip: Start with basic tools and add more as you gain confidence.
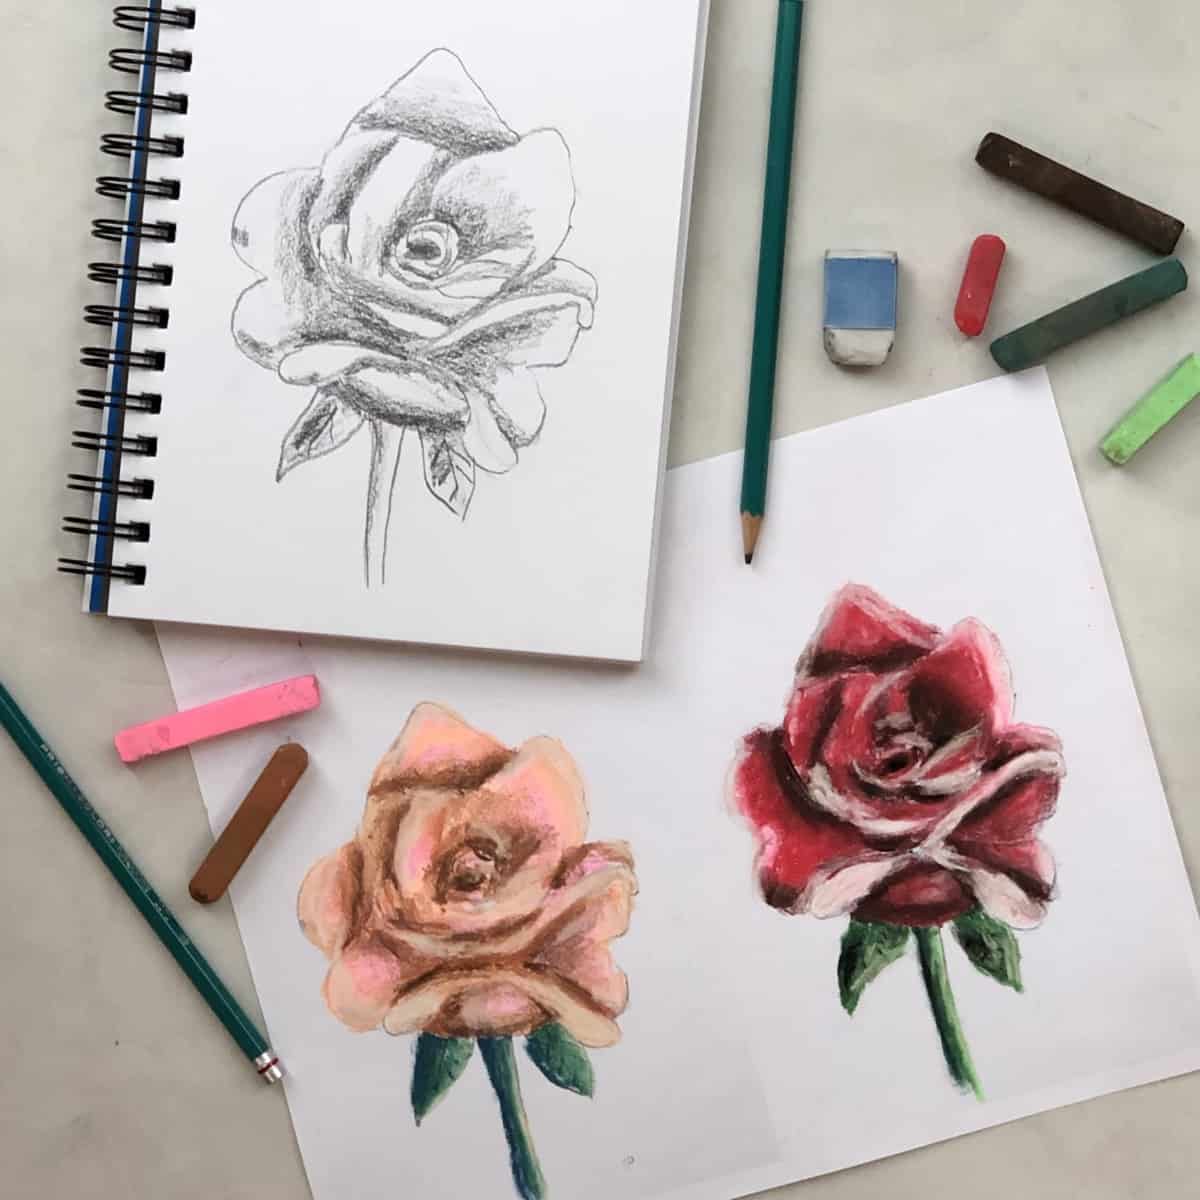
Step-by-Step Guide: How to Draw a Rose
Step 1: Sketch an elongated circle as the base for the rose.
Start by lightly drawing an elongated circle in the center of your paper. This shape will act as the foundation for your rose. Think of it as the "skeleton" that helps you map out the overall structure. Keep your pencil strokes light so you can easily erase or adjust them later.
Tip: Don’t worry about making the circle perfect. Roses are naturally asymmetrical, so a slightly uneven shape adds character to your drawing.
Step 2: Add a line to the left side of the circle to start forming the rose’s shape.
Next, draw a curved line starting from the top left of the circle and extending downward. This line will begin to define the outer edge of your rose. Imagine it as the first petal wrapping around the rosebud. Keep the curve gentle and natural to mimic the flow of real petals.
Step 3: Add a line to the right side to further define the structure.
Now, add another curved line on the right side of the circle. This line should mirror the one on the left but doesn’t need to be identical. Together, these lines create the basic outline of the rose’s bloom. You’re essentially framing the rosebud at this stage.
Step 4: Connect the ends of the lines to close the cylinder shape.
To complete the base structure, connect the bottom ends of the two curved lines with a horizontal line. This step gives your rose a cylindrical appearance, which will help you build the petals in the next steps. Think of this as the "container" for your rose.
Step 5: Draw a semicircle at the top to represent the outer petals.
At the top of your elongated circle, draw a semicircle that slightly overlaps the base. This semicircle represents the outermost petal of the rose. Keep the edges soft and rounded to capture the delicate nature of petals.
Pro Tip: Use light, sweeping strokes to make the petal look natural. Avoid sharp or rigid lines.
Step 6: Add curving lines to create the inner petals for depth.
Now comes the fun part—adding the inner petals! Start by drawing smaller, curving lines inside the semicircle. These lines should spiral inward, creating the illusion of layers. Vary the size and direction of the curves to make the petals look more realistic.
Begin with a few small curves near the center of the rose.
Gradually expand outward, adding more curves to form additional layers.
Use lighter pencil pressure near the edges to create a soft gradient effect.
Note: Pay attention to how real roses have overlapping petals. This layering adds depth and makes your drawing more lifelike.
Step 7: Sketch the stem and leaves using simple shapes.
Once the bloom is complete, it’s time to add the stem and leaves. Draw a long, slightly curved line extending downward from the base of the rose. This line forms the stem. For the leaves, use simple shapes like triangles or teardrops.
Step |
Details |
|---|---|
Draw the stem |
Use a single curved line to represent the stem. |
Add leaves |
Sketch triangles or teardrop shapes on either side of the stem. |
Add veins to the leaves |
Draw a central line in each leaf, with smaller lines branching outward. |
Observation Tip: Look at real leaves to notice their unique shapes and vein patterns. This will help you add realistic details.
Step 8: Refine the petals, stem, and leaves by adding texture and detail.
Now that you have the basic structure, it’s time to refine your drawing. Focus on adding texture and details to make your rose look more realistic.
Enhance the petals: Add small creases and folds to the petals. Use shading to create depth, especially near the edges and center.
Detail the stem: Add tiny thorns along the stem for a natural touch.
Refine the leaves: Use shading and cross-hatching to give the leaves a textured appearance.
Shading Tip: Imagine where the light is coming from. Add darker shading to areas that would naturally be in shadow, like the base of the petals or the underside of the leaves.
By following this step-by-step guide, you’ll have a beautiful rose drawing that looks both detailed and lifelike. Remember, practice makes perfect, so don’t be afraid to try these steps multiple times!
Shading and Blending Techniques

How to add depth to the petals using light and dark shading
Shading makes your rose look more real and three-dimensional. Think about where the light hits your rose. The parts facing the light will be brighter, and the areas away from it will be darker.
To create depth, use soft pencil strokes on the lighter parts of the petals. Press harder as you move to the darker areas. This makes a smooth change from light to dark. Pay attention to the petal edges and the rose’s center, where shadows naturally appear.
Tip: Take your time! Add shading slowly in layers. This avoids harsh lines and keeps your drawing soft and natural.
Tips for blending pencil strokes for a smooth, realistic look
Blending makes your rose look neat and lifelike. To get smooth shading, start with gentle strokes. Don’t press too hard, as strong lines can ruin the flow of your drawing.
Try these blending methods:
Use a blending stump to smooth edges and mix light and dark areas.
Cotton swabs or tissues are great for blending larger spaces evenly.
For colored pencils, use a colorless blender or solvent for a smooth finish.
Focus on light and dark areas instead of tiny details. Build up layers slowly, starting with light pressure and pressing harder for darker spots.
Pro Tip: Practice blending on scrap paper first. This helps you get used to the tools and techniques.
Using cross-hatching or stippling for texture
Adding texture makes your rose drawing more interesting. Cross-hatching and stippling are two easy ways to do this.
Cross-hatching: Draw crisscrossing lines to show shadows and shape. Closer lines make darker areas. This works well for stems and leaves, giving them a natural texture.
Stippling: Use small dots to create texture. Change the size and number of dots to add depth. This is great for details like petal edges or leaf veins.
Both methods help make your drawing look real. They show the tiny details of a rose and add depth to your artwork.
Observation Tip: Look at real roses to see how light affects their textures. Use this as a guide for your drawing.
Optional Tips for Coloring Your Rose

Picking colors for petals, stem, and leaves
Choosing the right colors makes your rose look amazing. Nature gives great ideas for matching colors. Use colors that go well together to make your drawing stand out.
Red petals are popular, but pink, yellow, or white are nice too.
Green shades work best for stems and leaves. Mix light and dark greens for depth.
Want something different? Try blue or purple petals for a unique look.
Tip: Colors that match well, like red petals with green leaves, create a calming effect.
How to layer colors for smooth gradients
Layering colors helps make your rose look realistic. Start lightly and add more layers slowly. This blends colors smoothly and adds depth to your drawing.
Looks Smooth |
Time Needed |
Compact Details |
|
|---|---|---|---|
O&R |
Less |
Medium |
Low |
LIVE |
Medium |
Long |
Medium |
Our Method |
Best |
Short |
High |
Studies show layering step by step gives better results. Begin with a base color, then add darker shades for shadows. Use lighter colors for areas hit by light.
"Our method uses simple steps to refine gradients and improve effects." This makes transitions smooth and natural.
Using highlights and shadows with pencils or markers
Highlights and shadows make your rose look alive. First, decide where the light comes from. This shows which parts will be bright and which will be dark.
Mark highlights early so you don’t color over them.
Use dots to show shiny spots and leave them white.
Blend nearby colors into the highlight for brightness.
Add shadows by layering darker colors in shaded areas.
Smoothly mix highlights and shadows for a natural effect.
Pro Tip: Try using opposite colors for shadows. For example, add purple to green leaves for realistic shading.
These tips help your rose look detailed and lifelike. Take your time and try different methods to see what works best for you.
Drawing a rose is only the start of your art journey. The more you draw, the better you’ll become. Practicing often helps you feel confident and improve your skills. Studies show that beginners who practice regularly make better and more detailed drawings over time:
Group |
Before Practice |
After Practice |
Key Results |
|---|---|---|---|
Practice Group |
Few drawings |
Students made more drawings and added more details after practice. |
|
Non-Practice Group |
Few drawings |
More drawings |
Both groups improved, but the practice group showed bigger progress. |
Younger Students |
Fewer correct answers |
More correct answers |
Younger students improved with drawings, while older ones did better without them. |
Why stop at roses? Try drawing other flowers or objects to grow your skills. This guide is just the beginning of endless creative opportunities. Every artist starts somewhere, so enjoy learning and keep drawing. You can do it! 🌟
Tucocoo Flowers Paint by Numbers
FAQ
How long does it take to draw a rose?
It depends on your pace. Most beginners finish in 20–30 minutes. Take your time and enjoy the process.
Can I use this guide for digital drawing?
Absolutely! The steps work for both traditional and digital art. Use your favorite drawing app or tablet.
What if my rose doesn’t look perfect?
That’s okay! Every drawing is unique. Practice regularly, and you’ll improve over time. Focus on enjoying the creative journey.